Get an Android Application

Own an Android app for your Website or blog
kindly contact:: sarthajroshan@gmail.com

Tawk.to

Followers

Buy me a Coffee

Popular Posts

Youtube

Services

Showing posts with label Android. Show all posts

Sunday, February 18, 2018

[Full Guid] How to host your website from Android with Static Domain name

In this post i am going to cover  complete information about hosting single website or multiple website from your Android device. 

Why we have to host from Android ?

             We all are using Multiple Android devices and we have to recharge data. Then why we need to pay for Web hosting?
                   
                     Yes, If you have an Android device and internet connection, then you can host your website free. NO MORE WEB HOSTING CHARGES.

How to Host a  Website from Android like Pro ?

Simply listing the requirements needed

  • Android device
  • Internet Connection
  • Web Server application
  • A Domain name (Here describes the method to get free Domain names)
  • FREEDNS Account (Free)


1. Set up your Android as a Web Server

                                       There are many free and paid applications available in the play store that can make your device a server. eg: KSWEB, Palapa Web server etc.
Here I am showing an example with Palapa web server : Use Android device as a Web Server

2. Setting Domain Name for your server

                                       If you have already buy a domain. Then set the name servers of the domain to ns1.afraid.org,ns2.afraid.org,ns3.afraid,org respectively.
                                       If you want to set up a new Domain name then go to freenom.com and create an account. Then you can register free .tk .ml .gq .cf domains absolutely free.

For more to about registering free domain name from Freenom : Get Free Domain name with Freenom.com .

    After registering your domain do not forget to change name servers to 
ns1.afraid.org
ns2.afraid.org
ns3afraid,org .


3. Get static domain Name with your Android device's IP

                                        If you are using Mobile internet connection then the IP address will changes every time you reconnects. It causes your Domain name not reach your website.
There has a solution for this with FreeDNS. You already set your Domain's nameserver to FreeDNS by changing to ns1.afraid.org. Now you have to create a new account with FreeDNS and add your Domain name to FreeDNS. make the Domain name private to block others using your domain's subs.

               After adding your domain name to FreeDNS, Download FreeDNS updater app from play store and login to your account with your FreeDNS username and Password. This application is used to get your Server (android device) IP updated to Domain name, So domain name can redirect to your server. In the app select your Domain name and set IP updating time and click Set.


4. Set up your website

                                      Upload your web pages to the server folder and enjoy free hosting..


Sunday, February 11, 2018

How to get Whatsapp Payment feature..Here is the Trick

Yes, It is true..


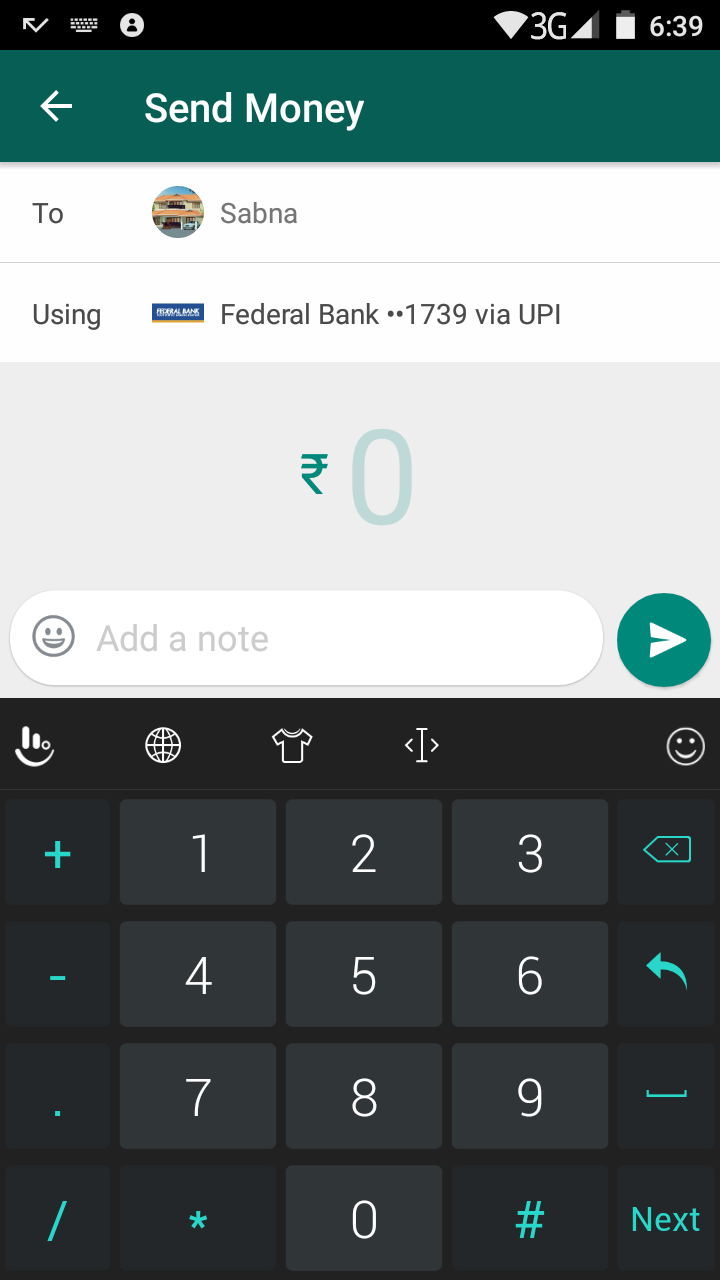
       Now You can use Whatsapp not only for messages/calls but also for sending Money. 

The long awaited feature is out in India. The Payment service is available for limited beta testers of Whatsapp directly. Others need to wait until another update from whatsapp. But If you didn't like to wait...Here the way..

The payment service users can invite their friends into Whatsapp Payments.

How the Whatsapp Payment Works:

            Whatsapp Payment feature running with the support of Unified Payment Interface (UPI) of India. Yes, it is simple like using apps like tez. It is easy to send money like sending images and videos.

Note : For enable this service your number must linked with any of the UPI enabled bank.

How to get The Whatsapp Payment fetaure;

  • Update Your whatsapp from Playstore 
  • Goto Whatsapp Settings >> Payments ( If you do not see the Payment Option follow this Invite Link to get invited in to payments service)
    Whatsapp Payment Settings
  • In Payments option Accept terms and conditions
    Whatsapp Payment setup
  • Then Click on Verify SMS (Must have balance in your number)
    Whatsapp Payment setup verify
  • Select Your Bank
    Whatsapp Payment setup bank
  • Select Account
    Whatsapp Payment setup account
  • Done.


How to Send Money through Whatsapp:

  • Select your Contact and Click on Attachment button
  • You can see the new option payment
    Whatsapp Payment send money
  • Enter the amount and Create/Enter your UPI PIN.
     
  • Done.


How to Invite friends to Whatsapp Payments:

  • Open Chat of your friend
  • Click attachment >> Payment
  • Done

Saturday, December 24, 2016

GET FREE 100 RS RECHARGE BY MISSED CALL TO 18005320295

CNN-IBN MobiKwik started a Free Recharge Initiative under which CNN-IBN is giving giving free recharge on a Missed Call to 18005320295 Number. According to the several people claiming that if you do a missed call to 18005320295 then you will receive a message which will look like message sender name : BH-MBIKWK “Welcome to CNN-IBN ModiKwik free recharge initiative. Thank you for giving a missed call. Your recharge will be done withing 24 hours: http://m.onelink.me/7603a241”  This Free recharge news is spreading very quickly so we have also decided to inform our readers about Get Rs 100 Free Recharge Missed Call to 18005320295

Monday, November 7, 2016

Parsing problem when downloading through Google Chrome

Hi guyz,
     
         I would like to explain a solution for a Google chrome bug in android. Sometime if you download any apk through Google chrome it will download only some kbs and if you open it tells ''parsing error''. It is because chrome can't download the  whole file, only a part of it is downloaded. You can rectify this bug with download manger.
 
       You may used download managers in winows like IDM. I introducing a Download manager for Android here.

Download Advanced Download Manager (ADM) from playstore

It is fastest and reliable Download manager for android.

Wednesday, November 2, 2016

Use Jio 4G sim in 3G phones

you can easily use your free jio sim in any of the 3g devices. You need to follow the trick very carefully.


 FOR QUALCOMM CHIPSET 3G PHONE


  • Download Shortcut master android application from Here.
  • After download simply install in your android device.
  • Now open this app and select engineering mode or service menu from main menu.
  • Here find system APP OPTION if this option is not available then dial *#2263# from dialer app. Now Go To Key Input And Enter 0000 and Wait some times.
  • After that select System app option and you need to change LTE bands.
  • Now go to Select - Protocol - NAS - Network Control - Band Selection - LTE Band and select Band 40.
  • After that restart your 3G phone and enjoy reliance jio 4G sim in your 3G phone.


for MEDIATEK CHIPSET 3G PHONE

  • First, step to download MTK Engineering Mod android application from here
  • After download, this app install on your android device.
  • Now open this app and dial your engineering mod code to open engineering code find your correct code for your android device according to model.
  • This android application allows you to run advanced setup from engineering mode menu. This code is different for all android device.
  • After service mode is open you need to configure preferred network.
  • In network mode option select 45 LTE/WCDMA/GSM option.
  • After select simply restart your android device and enjoy reliance jio 4G sim in your 3G phone.

Tuesday, October 25, 2016

Use Android device as a Web Server

Use Android device as a Web Server


Hello Guyz,
       
        In this post I am gonna show you how to make your Android device as server for hosting a website or making files online. For this, I introduce you an app called “ Palapa Web Server”. You can download this app from playstore.
                            You may familiar with windows apps like XAMPP to host a web server. This app also has easy modes to work with. Follow the step by step guide here
1.     Download Palapa Web Server from playstore 
2.     Open the app          Then you can see a dialogue appears for installing plugins for web hosting. Click install on that dialogue window
3.     Edit Settings             There have so many settings for advanced web hosting like php integration database integration etc.. you can edit it if you needed. Also you can set port and select folder in the storage that you want to host


4.     After saving settings click on “start web server” or “start all services” to make your website online

5.       
Then you can see your Ip address and Port


You can Type http://127.0.0.1:8080 (by this tutorial) to see your site online


Tuesday, October 4, 2016

Crack a WiFi network by 'dsploit' and 'Network spoofer'

Hi friends,
             
            Today I would like to show you how to hack a WiFi network. By this hack you will able to ..
..Kill connections
..Spoof IP address
..Redirect users
..Change words in the page
..Check vulnerbility to other users
..Kill specific user
..Save passwords of users
..Redirect youtube videos
..Change text
..Change image
..Block people from visiting specified websites
         For this you need to install two Apps Dsploit App and Network spoofer.
Dsploit APK : DOWNLOAD
Network Spoofer APK : DOWNLOAD 

Vidoeo Tutorial will publish soon...
Subscribe our youtube channel


Monday, October 3, 2016

Hack WiFi Password with Android (ROOT)

- No comments
Hello guys,
              There has a most effective method to hack WiFi network's password by Android with bcmon tool. But this tool not work for all devices. It need a device with broadcom chip to hack WiFi passwords.
But here I showing you an easy method to hack WPS ENABLED WiFi networks with these apps..
This app need root permission to get passwords effectively.
Download WiFi hacker Wps smart APK
DOWNLOAD
Download Wps Wpa tester APK
DOWNLOAD
Download AndoDumpper APK
DOWNLOAD
         

Wednesday, September 21, 2016

Whatsapp Prime 1.2.1 with enabling all hidden features

Hello friends, WA Prime is an alternative version of the WhatsApp and is based on the latest version of the application of WhatsApp 2.16.212, Design by King Khan and supports all Android devices in addition to other features which are listed below.
Enjoy Most of The Hidden Features
Exclusive Features
Video Calls
Group Invite Links
Share Data with Facebook
Two Factor Auth.
Doodle Enabled
MultiCast (Send Single picture to multiple chats with one touch)
Change Log
Base Undated to 2.16.212
Removed Privacy due to crash
All Hidden Features Unlocked
Video Call , Group Links , FB Data , Doodle & Multi Cast.
Fixed the issues with the conversation entry & replies option
*Documents MB Limit Modified to match with iOS (128MBs)
Fixed things under the hood
Features
Anti Ban
Phone and status moved to its original location.
Extra Mute Conversation Options (1 hrs, 8 hrs , 1 day , 1 week , 1 year , Forever )
Extended Media Caption To 4,000 Words!
Extended Media Share Limit From 10 to 300!
Extended Status Limit From 139 to 256!
Extended Image Quality from 80 to 100 (no compression)
Extended Video and Media Limit to 72 MB! (39.95 MB Verified)
Extended 10 default statuses to 15 cool one!
Centralized All Title Cards.
Materialized Home Style , Conversation Entry , And Ticks.
Materialized Contact Info Page.
Added Ripple Effect For 5.0+ Devices.
Added Animation for Theme.Prefs Activities
Materialized UI PNGs
Material Emojis (One Emojis)
Material Teal 500
Solid Background Colors changed to Material Colors.
Disabled Background APK Downloading.
Removed Memory DUMP & Suspended Unnecessary Activities.
Disabled In App Updater Checker.
App Size Reduced To 15MB for Saving The Bandwidth.
Telegram Links Unlocked
Disabled Name , Date And Time while Copying Multiple Messages.
Disabled Heads-Up Notification For All Android Versions.
Disabled Proximity Sensor while Playing Voice Messages.
Added Profile Picture Zoom Option (similar to iiOS
Added Option To Save and Restore App Data (like titanium backup)
Added Ability to copy other’s status.
Removed The Call Icon To Reduce Accidentally Calls.
Downlaod Link
Download
Thanks For Visiting......

Sunday, April 3, 2016

Hack Mini Militia (unlimited health and ammo etc)

- No comments

Hi guyz
I have some mods for Mini militia.It give you unlimited health, unlimited flying power. Then some special mods for take any weapon as dual, kill enemies at one shot,etc. It is a awesome app. Download the app Mini militia mods from here .It need root permission to work

For Mod of Mini militia Version 2.2.19 (Latest)


For Mod of Mini militia Version 2.2.16


Sunday, August 30, 2015

Most simple way to get free recharge online

Get free recharge simply online...
You can get free recharge with an android or ios device..
you can get RS 25 per referral free

  1. First download this app Taskbucks
  2. After downloading taskbucks ,,create an account with your mobile number and email address and referral code 9UDJXGT1
  3. Then download simple apps from Taskbucks (only less than 10 MB) and get 15 to 20 mobile recharge free..
It is the simple way to get online recharges.......
Note: It only available in India


Mobile number :   (enter ur mobile number)
Email address :   (enter ur email address)
Referral code :    9UDJXGT1

Sunday, June 28, 2015

Root Your Micromax A Series in just a Click

- 1 comment

Rooting of Micromax A Series is easy now with framaroot app. You may want to know what is rooting and what is its benefits....I can Explain it to you....

Well, rooting an Android phone simply means to gain administrative privileges (or root access if you are from a Linux background) on the system. When you buy a new Android phone, you are just a guest user on the phone. You can use the phone, just as a guest would use Windows, but you will not be able to make any changes to the system files.
However, after you have a root access over your phone, you could browse your Android root folder and make any changes to the system files on your phone. And that’d mean the ability to make all kinds of changes and install more powerful apps that you can’t use on a non-rooted phone.

Benefits of Rooting an Android Phone

Put your handset on a diet


The first benefit of accessing administrator privileges over Android is full control over the applications installed on your handset. No longer do you have to suffer from the cluttered app drawers and reduced memory space taken up by pre-installed carrier and manufacturer applications, you can instantly cut the bloatware and keep only the apps that you really want.
Even if you’re up to date with Android 4.1 or above, which grants users the ability to disable these pre-installed apps if you don’t want to see or use them, you can’t permanently remove them, they’re still there eating up your memory space. Rooting is the only way to permanently get rid of these pesky apps, but please don’t uninstall something crucial or your handset may stop working properly. Apps like Titanium Backup are particularly helpful for organising and culling this bloatware.

Better backups


This brings me nicely on to the next major benefit of Android, improved backup and restore options. As already mentioned, Titanium Backup is one of the most popular backup apps used by rooters, and this, or a similar app, is essential if you’re going to start tinkering around with Android software. But as well as acting as a safety net in case you uninstall something important, Titanium Backup can also be used to backup your user data, from SMS messages to browser bookmarks.
ClockworkMod Recovery Backup Cropped
ClockworkMod Recovery offers superior protection against faulty updates and bricking your handset.
Even better still, once rooted you can create complete backups of your entire handset using the ClockworkMod Recovery option, providing you with extra protecting in case of a major malfunction. Recovery can only be accessed before booting into Android, but it provides additional backup options in case, for whatever reason, Android fails to boot properly or experiences a crippling error. This makes ClockworkMod Recovery an essential tool for those looking to install custom versions of Android.

Keep up to date with the latest version of Android


Once you’re fully backed up you’re ready to move up to one of the other major perks of rooting, installing different versions of Android.
We all know that manufacturers are often pretty slow at delivering the latest Android offerings even to their flagship handsets, let alone aging devices. So if you’re not a Nexus or Play Edition device owner, rooting opens the door to much faster Android updates, thanks to the developers who put time into porting the latest updates to various handsets.
Pretty much every semi-popular handset has a decent following of developers working on porting the latest versions of Android to their handsets, most of which can be found over on the XDA Forum. The only sacrifice here is that you won’t receive official manufacturer versions of Android, so no updated Touchwizz or Sense5 features, but if we were really too worried about that we probably wouldn’t be rooting  in the first place.

Dress to impress

My final reason for rooting your handset is the wider range of customization and theming options, after all who doesn’t want their desktop to look pretty.
Looking good there Android.
Although there are options to tweak themes and whatnot that don’t require rooting, usually through third part launchers such as ADW, rooting gives you access to the important files needed to make changes in folders that are usually hidden from users. Access to the /system/fonts folder allows users to install and replace custom fonts. You can also flash zip files from Recovery to install themes too. But if all that folder browsing isn’t for you, there are also a few root only theme applications to choose from.
One example is Theme Chooser, included by default as part of CyanogenMod, which has plenty of custom themes available, and even works with ADW themes too. Alternatively, theXThemeEngine works with all rooted handsets, allowing you to pick between themes after installing them from traditional apk files, so there’s no need to flashing zip files or tinkering in system folders.

Now Start The Rooting Process

I. Before You Begin:

1. This will void the warranty of your device. However, you can reinstate the warranty by unrooting your device if there’s any unrooting procedure available.
2. This only works for the devices listed on this page.

II. Downloading Required Files:

1. Framaroot APK (It’s attached in the first post)

III. Rooting Your Android Device (Framaroot Method):

1. Download and place the Framaroot APK onto your Desktop.
2. Connect your device to your PC using the USB cable.
3. Copy the Framaroot APK over to the root of your SD card.
4. Once it’s been copied, disconnect your device from your PC.
5. Head to Menu>>Settings>>Security on your device and enable the Unknown sources option.
6. Open the File Manager app on your device and install the app you copied earlier to your device.
7. Once the app’s been installed, launch it from your App Drawer.
8. Select Install SuperSU from the first dropdown menu.
9. As for selecting the exploit (there’re three, Sam, Frodo and Aragorn), head to this page and see what exploit works for your device. Once you find it out, tap on it in the app.
10. The app should begin rooting your device, shouldn’t take too long to finish.
11. Reboot your device once it’s been rooted.
12. You’re all done!
Excellent! You’ve successfully rooted your Android device using the Framaroot app and you should now be able to see the SuperSU app in your App Drawer!

JioFi AT RS 999

Buy me A Coffee